 Finding myself dissatisfied with the difficulty inherent to making this mod, I had to come up with an easier way. If you don't know what I'm talking about, go and read my previous how to. You can then understand that the usage of the Quick Clamp assumed that you had 4 hands. Hoping to make the mod easier, the following post is what I've come up with.
I must start with a disclaimer that a sturdy table equipped with a vice is definitely the way to do this in the safest manner. Having said that, I don't have a vice. But I have tried to represent a safe way to accomplish the mod. Use your own power tools at your own risk. Please take your time and be safe.
You should read this entire post to understand how I went about this mod. You might have alternate tools or ideas that would make this an easier mod.
TOOLS:
1) Cordless Drill
2) 17/64 Drill Bit
3) 4 - 8 inch zip ties
4) Regular Screw Driver
5) 7/16 wrench
6) Hammer
7) Center Punch
8) One coffee can or equivalent
SUPPLIES: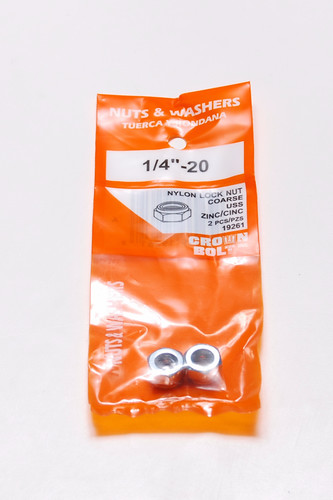
1) 1/4" Nylon Lock Nut
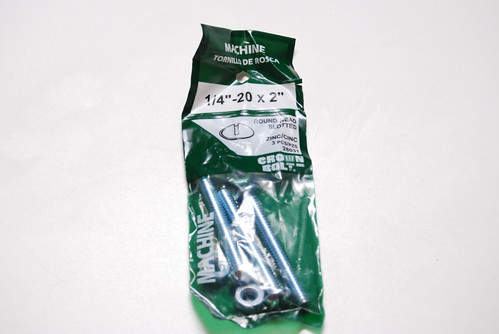
2) 1/4"-20 x 2" Round Headed Machine Screw with Hex Nut
3) 2 - 1/4" Flat Washers (not pictured)
4) 1 - Home Depot Clamp (you know the one) Remove the Green rubber covers from the handles and set them aside for later replacement. Then put two zip ties through the holes at the top end of the clamp. Don't over tighten the ties. But secure them so that there is no slack in the loops. Next, in a similar manner, put two zip ties through the holes that were exposed by removing the green rubber handle covers. Secure them so that there is no slack in the loops. Trim off the excess ends of the zip ties to make the clamp more manageable for the remainder of the mod.
(Sorry, no photo of the drilling of the rivet. But, you can see the coffee can in action in the next photo. It is the same concept.) Place the clamp on top of the coffee can so that the center rivet is approximately centered over the coffee can. Next drill off the expanded part of the rivet. You will know when you've gotten enough of the rivet as you will begin to drill into the hole in the clamp handle. Don't drill through the handle just yet. Only remove enough of the rivet so that we can begin to punch it out.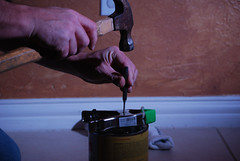 With the clamp centered over the coffee can, gently begin to punch the rivet downward. Take care to only punch the rivet 1/2 to 3/4 of the way out. When you've done this much, STOP. We will use the rivet as is to hold the spring in place.
With the clamp still centered over the coffee can, drill through the handles on the side without the rivet. Take care and go slow. The rivet is left in with the intent to assist in holding the spring aligned with the holes being drilled.
Now, using the center punch, completely punch the rivet out.
This is probably the trickiest part now. Use your thumb to align the spring so that you can place the 2 inch bolt with one flat washer about 1/2 way into the newly enlarged holes.
Again, center the clamp over the coffee can with the bolt side down in the coffee can.
Drill through the handles. The inserted bolt is intended to assist in holding the spring aligned with the holes being drilled on the opposite side.
Now, completely insert the bolt through both sides of the clamp.
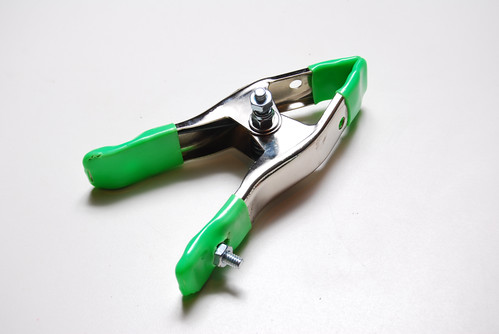
You are home free now. Add another flat washer and a nylon locking nut. Tighten the nut snuggly (do not over tighten) using the screw driver and wrench. 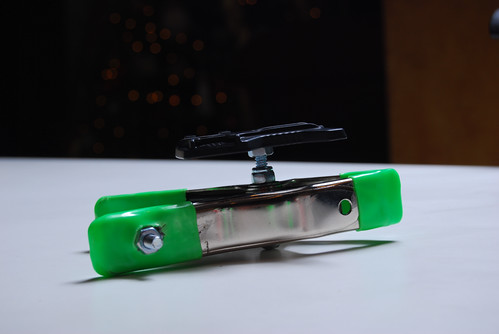 For my use case, adding the remaining hex nut provides for a "locking" mechanism to help hold my AS-19 Speedlight stand. This is the finished product. The 1/4"-20 x 3/4 stud on the handle was added in a previous DIY post. Now, I can mount my speedlights to either horizontal or vertical structures with confidence.
Thursday, December 13, 2007
Better Process for Making the New Improved DIY Speedlight Clamp
![]()
Subscribe to:
Post Comments (Atom)
No comments:
Post a Comment