Send your own ElfYourself eCards
Thursday, December 18, 2008


Thursday, October 30, 2008
Me and B

Brandon and I decided to revitalize an old bicycle. As usual, Mister OCD (me) got all involved and over spent. But, the result was something Brandon was quite proud of. Let me tell you all about it.
Yes, it was a $50 Mongoose from Walmart. But, then he said he wanted to build a cool bike. Dad thought that would be cool, too. Then Dad's OCD kicked in. And, well, the kid's got a cool bike now.
Weinmann Rims
Odyssey Twisted PC Pedals
Odessey Griswald Grips
Bulldog Brakes
Animal Brake Cable
Diatech Brake Lever
Redline Chain Wheel
Redline Crank
Mongoose Frame/Bars/Fork/Tires
Some Generic Quill/Stem
ACS Claws Freewheel
KMC Z Chain
RustOleum - various cans
Brandon picked flourescent green spray paint from Home Depot that was intended to attract attention to signs for yard sales! He also grabbed flat white for the forks and bars. Three coats of green with sanding in between, followed by a clear coat and I think the paint job turned out well. It was a fun project. Of course, it couldn't get finished quick enough for Brandon. He is so much like me it is scary.
Here are a couple more pictures: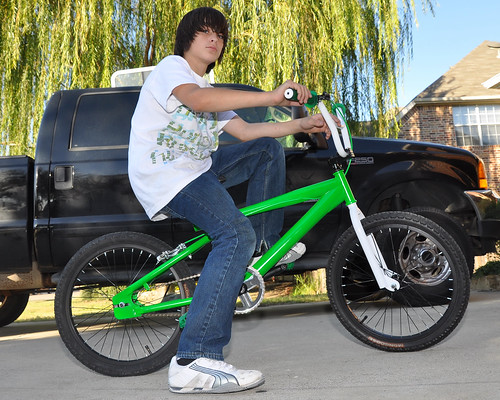
 Read more!
Thursday, March 6, 2008

Thursday, December 13, 2007
Better Process for Making the New Improved DIY Speedlight Clamp
 Finding myself dissatisfied with the difficulty inherent to making this mod, I had to come up with an easier way. If you don't know what I'm talking about, go and read my previous how to. You can then understand that the usage of the Quick Clamp assumed that you had 4 hands. Hoping to make the mod easier, the following post is what I've come up with.
I must start with a disclaimer that a sturdy table equipped with a vice is definitely the way to do this in the safest manner. Having said that, I don't have a vice. But I have tried to represent a safe way to accomplish the mod. Use your own power tools at your own risk. Please take your time and be safe.
You should read this entire post to understand how I went about this mod. You might have alternate tools or ideas that would make this an easier mod.
TOOLS:
1) Cordless Drill
2) 17/64 Drill Bit
3) 4 - 8 inch zip ties
4) Regular Screw Driver
5) 7/16 wrench
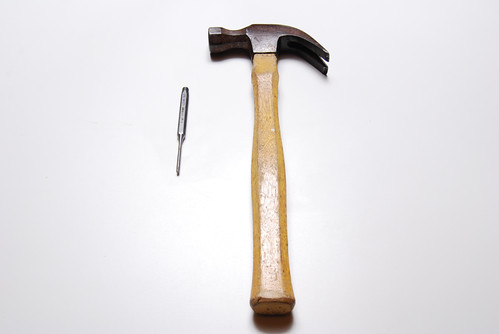
6) Hammer
7) Center Punch
8) One coffee can or equivalent
SUPPLIES: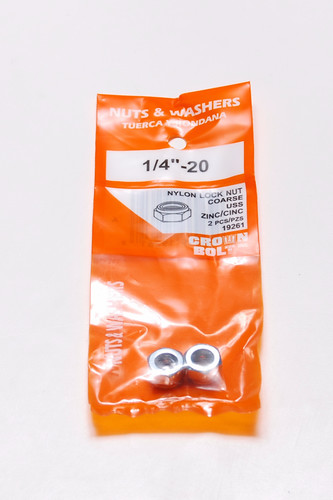
1) 1/4" Nylon Lock Nut
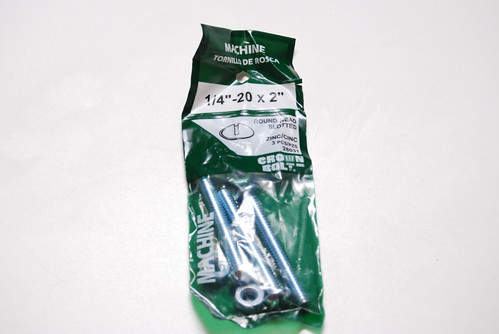
2) 1/4"-20 x 2" Round Headed Machine Screw with Hex Nut
3) 2 - 1/4" Flat Washers (not pictured)
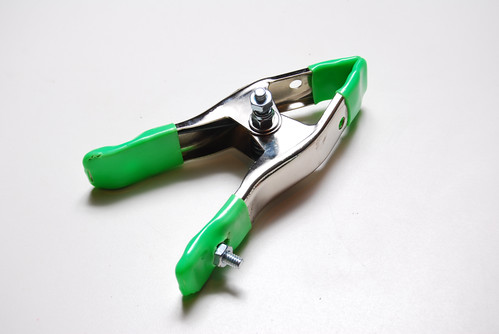
4) 1 - Home Depot Clamp (you know the one)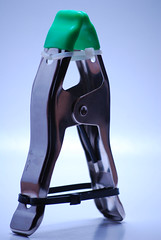 Remove the Green rubber covers from the handles and set them aside for later replacement. Then put two zip ties through the holes at the top end of the clamp. Don't over tighten the ties. But secure them so that there is no slack in the loops. Next, in a similar manner, put two zip ties through the holes that were exposed by removing the green rubber handle covers. Secure them so that there is no slack in the loops. Trim off the excess ends of the zip ties to make the clamp more manageable for the remainder of the mod.
(Sorry, no photo of the drilling of the rivet. But, you can see the coffee can in action in the next photo. It is the same concept.) Place the clamp on top of the coffee can so that the center rivet is approximately centered over the coffee can. Next drill off the expanded part of the rivet. You will know when you've gotten enough of the rivet as you will begin to drill into the hole in the clamp handle. Don't drill through the handle just yet. Only remove enough of the rivet so that we can begin to punch it out.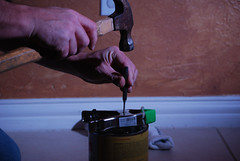 With the clamp centered over the coffee can, gently begin to punch the rivet downward. Take care to only punch the rivet 1/2 to 3/4 of the way out. When you've done this much, STOP. We will use the rivet as is to hold the spring in place.
With the clamp still centered over the coffee can, drill through the handles on the side without the rivet. Take care and go slow. The rivet is left in with the intent to assist in holding the spring aligned with the holes being drilled.
Now, using the center punch, completely punch the rivet out.
This is probably the trickiest part now. Use your thumb to align the spring so that you can place the 2 inch bolt with one flat washer about 1/2 way into the newly enlarged holes.
Again, center the clamp over the coffee can with the bolt side down in the coffee can.
Drill through the handles. The inserted bolt is intended to assist in holding the spring aligned with the holes being drilled on the opposite side.
Now, completely insert the bolt through both sides of the clamp.
You are home free now. Add another flat washer and a nylon locking nut. Tighten the nut snuggly (do not over tighten) using the screw driver and wrench. 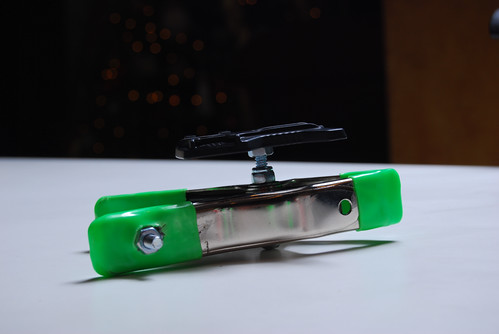 For my use case, adding the remaining hex nut provides for a "locking" mechanism to help hold my AS-19 Speedlight stand. This is the finished product. The 1/4"-20 x 3/4 stud on the handle was added in a previous DIY post. Now, I can mount my speedlights to either horizontal or vertical structures with confidence.
Read more!
Monday, December 3, 2007
Merry Christmas To All My Flickr Friends
I have learned so much from the Strobist.com flickr group and all of the information made available by David Hobby on his Strobist blog. I may not be very good at putting it all into practice. But I can say that I am less ignorant about lighting and what it can do to improve my photographs.
And it is darn fun. "How fun?" you ask.
--------------------
Well, I think it was a blast. Knowledge of grids, gobos, clamps, and what seems like infinite wisdom can all be had if you take the time to read the information available at Strobist.
I have three Speedlights. One SB-600 and two SB-26 flashes fill out the roster. And I only have one Gadget Infinity Trigger/Receiver set. So, I wanted to get creative all while applying some of what I've learned. Here is how it went down.
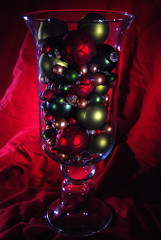
I used the SB-600 as my main light. It was triggered by a Gadget Infinity trigger. The light was controlled with a DIY Black Straw Grid and was pointed at the Virginia Hurricane glass from 45 degrees on the right. I learned about the flash, the trigger, and the grid all in the Strobist.com flickr discussion group. Users with experience discussed these when asked or may have volunteered their opinions without prompting. It's kinda like compound interest. The knowledge pool just keeps growing and growing.
I only knew that the subject was called a Virginia Hurricane because of my wife's plethora of Southern Living decor. She reads those mags like I read Strobist. Scary.
Back to the picture.
I wanted to practice lighting the main subject and the backdrop separately as I've read about, but on a smaller scale. I used one of the SB-26 lights with another black straw grid (my favorite grid by the way) pointed at the background from about 45 degrees on the left oriented just so the light would miss the subject, but illuminate the backdrop nicely. The biggest problem with this setup is how to trigger the second flash. Remember the SB-600 flash used a grid. This prevented any light from it reaching the SB-26 to fire the slave. As I said earlier, I've only got one receiver to trigger. So, to trigger the SB-26 lighting the back ground, I tried to get a little clever. Behind the subject to the left, placed nearly in direct line of sight of the SB-600, was the last SB-26. The light from the SB-600 would fire the SB-26 behind the subject, in turn causing the SB-26 on the left to fire and light the background. I used a gobo on the last flash (yes, I said gobo) to control the output to hit only the other SB-26. But, after some experimentation allowed some of the light from the rear flash to hit the back of the subject, providing some separation from the back ground and giving the subject some dimension.
The SB-600 was mounted to the GI receiver on a New Improved DIY Speedlight Clamp that was clamped to a kitchen chair, the inspiration for which came from, you guessed it, discussions at flickr Strobist.com and the Strobist blog. The SB-26 lighting the background was mounted on a light stand a la Lighting 101.
Like I said, darn fun.
Read more!
And it is darn fun. "How fun?" you ask.
--------------------
Well, I think it was a blast. Knowledge of grids, gobos, clamps, and what seems like infinite wisdom can all be had if you take the time to read the information available at Strobist.
I have three Speedlights. One SB-600 and two SB-26 flashes fill out the roster. And I only have one Gadget Infinity Trigger/Receiver set. So, I wanted to get creative all while applying some of what I've learned. Here is how it went down.
I used the SB-600 as my main light. It was triggered by a Gadget Infinity trigger. The light was controlled with a DIY Black Straw Grid and was pointed at the Virginia Hurricane glass from 45 degrees on the right. I learned about the flash, the trigger, and the grid all in the Strobist.com flickr discussion group. Users with experience discussed these when asked or may have volunteered their opinions without prompting. It's kinda like compound interest. The knowledge pool just keeps growing and growing.
I only knew that the subject was called a Virginia Hurricane because of my wife's plethora of Southern Living decor. She reads those mags like I read Strobist. Scary.
Back to the picture.
I wanted to practice lighting the main subject and the backdrop separately as I've read about, but on a smaller scale. I used one of the SB-26 lights with another black straw grid (my favorite grid by the way) pointed at the background from about 45 degrees on the left oriented just so the light would miss the subject, but illuminate the backdrop nicely. The biggest problem with this setup is how to trigger the second flash. Remember the SB-600 flash used a grid. This prevented any light from it reaching the SB-26 to fire the slave. As I said earlier, I've only got one receiver to trigger. So, to trigger the SB-26 lighting the back ground, I tried to get a little clever. Behind the subject to the left, placed nearly in direct line of sight of the SB-600, was the last SB-26. The light from the SB-600 would fire the SB-26 behind the subject, in turn causing the SB-26 on the left to fire and light the background. I used a gobo on the last flash (yes, I said gobo) to control the output to hit only the other SB-26. But, after some experimentation allowed some of the light from the rear flash to hit the back of the subject, providing some separation from the back ground and giving the subject some dimension.
The SB-600 was mounted to the GI receiver on a New Improved DIY Speedlight Clamp that was clamped to a kitchen chair, the inspiration for which came from, you guessed it, discussions at flickr Strobist.com and the Strobist blog. The SB-26 lighting the background was mounted on a light stand a la Lighting 101.
Like I said, darn fun.
Read more!
Thursday, November 29, 2007
New Improved DIY Speedlight Clamp
Since doing the previous DIY with this $0.99 Home Depot Clamp, I've come up with an improved version that I like much more. Replacing the rivet center post with a 1/4 x 20 x 2 inch bolt makes this clamp useful in both vertical and horizontal orientations.
You should read this entire post to understand how I went about this. You might have alternate tools or ideas that would make this an easier mod. It was a little challenging.
TOOLS: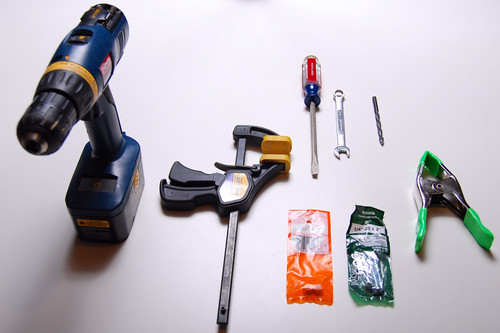
1) Cordless Drill
2) 17/64 Drill Bit
3) Quick Clamp (or vice or alternative)
4) Regular Screw Driver
5) 7/16 wrench
6) Hammer
7) Center Punch
SUPPLIES:
1) 1/4" Nylon Lock Nut
2) 1/4"-20 x 2" Round Headed Machine Screw with Hex Nut
3) 2 - 1/4" Flat Washers (not pictured)
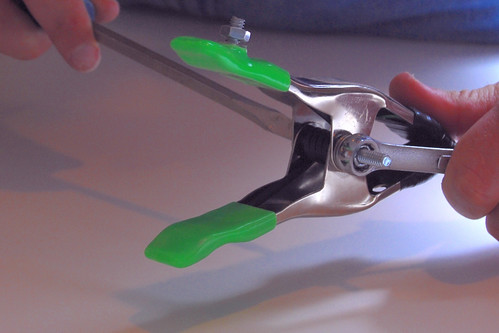
4) 1 - Home Depot Clamp (you know the one)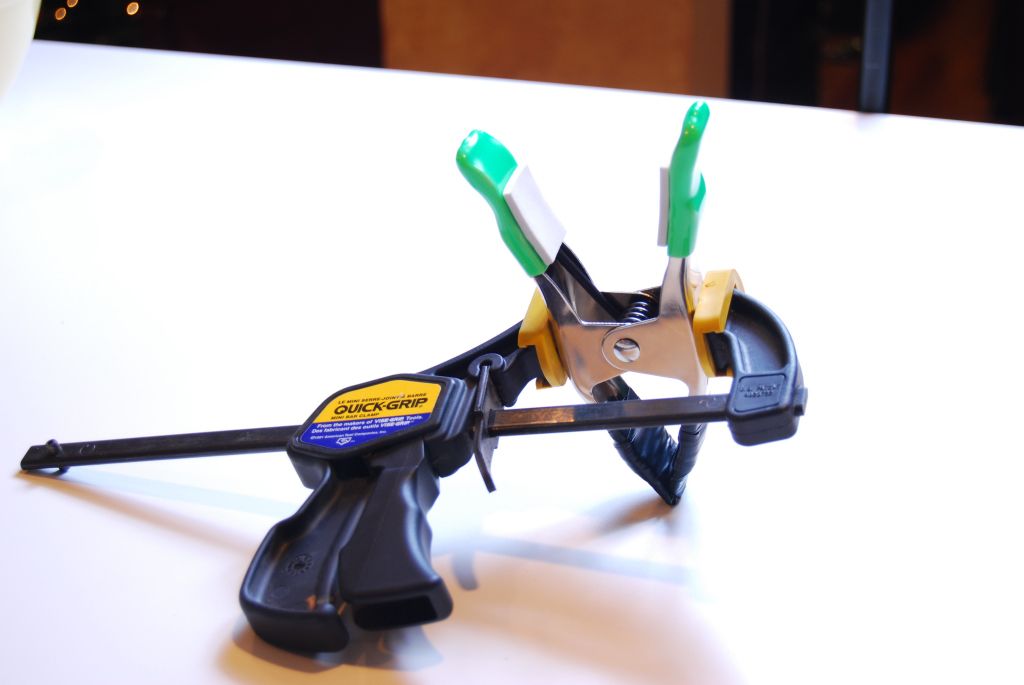 First affix the Quick Clamp to the Home Depot Clamp to be modified as seen here. Don't over tighten. Gentle pressure is plenty.
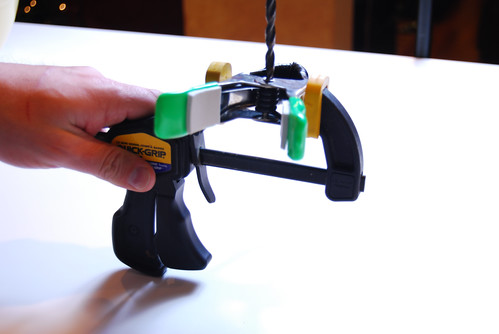 Next drill off the expanded part of the rivet. You will know when you've gotten enough of the rivet as you will begin to drill into the hole in the clamp handle. Don't drill through the handle just yet. Only remove enough of the rivet so that we can punch it out.
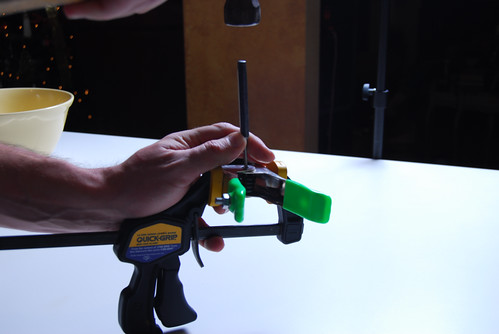 At this point you will likely need another pair of hands. These photos are intended only to demonstrate the concept. Use the hammer and punch out the rivet. Take care and go slow. You don't want the clamp to come out of the Quick Clamp. That would make finishing the mod VERY difficult.
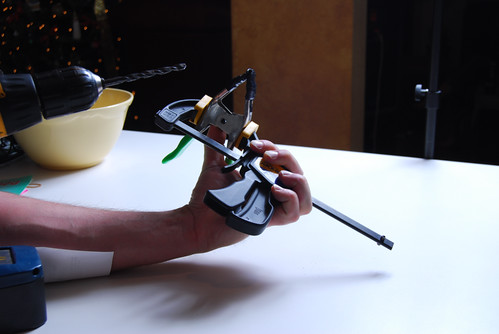 You can use your thumb or another person can use the screw driver. But somehow, you need to align the holes of the clamp AND the spring so that you can drill through the handles to enlarge the holes without damaging the spring. You need to do this on both sides of the clamp.
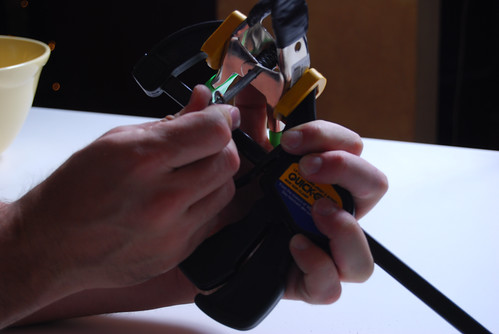 Again, using your thumb, align the holes so that a machine screw and flat washer can be inserted through the bottom.
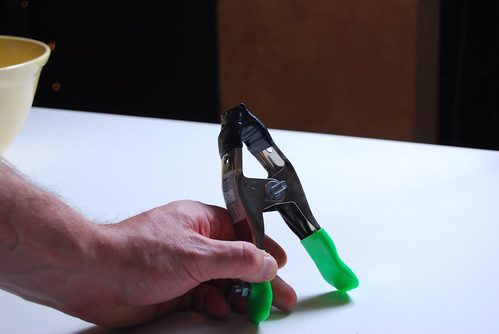
 You are home free now. Add another flat washer and a nylon locking nut. Tighten the nut snuggly (do not over tighten) using the screw driver and wrench. Adding the remaining hex nut provides for a "locking" mechanism to help hold the AS-19 Speedlight stand. This is the finished product. The 1/4"-20 x 3/4 stud on the handle was added in the previous DIY post. Now, I can mount my speedlights to either horizontal or vertical structures with confidence.
Read more!
Subscribe to:
Posts (Atom)